
A consumable component of the bicycle drive train are chains. Your bike’s chain will deteriorate as you rack up the miles. The rivets and rollers that make up the chain’s internal components start to wear out and give the chain the appearance of stretching. This deterioration can lead to poor shifting, early cog wear, and even skipping over cogs because the chain will not mesh well with the cogs and chainrings.
Knowing when to replace your chain can actually result in a short-term cost savings since replacing a chain is much less expensive than replacing a cassette.
Keep in mind that using a chain beyond its recommended wear limit will cause your cogs and chainrings to prematurely wear out, so staying on top of this regular maintenance task can save you a lot of money and trouble in the long run.
For more information, continue reading.
Table of Contents
Do You Need A New Chain?
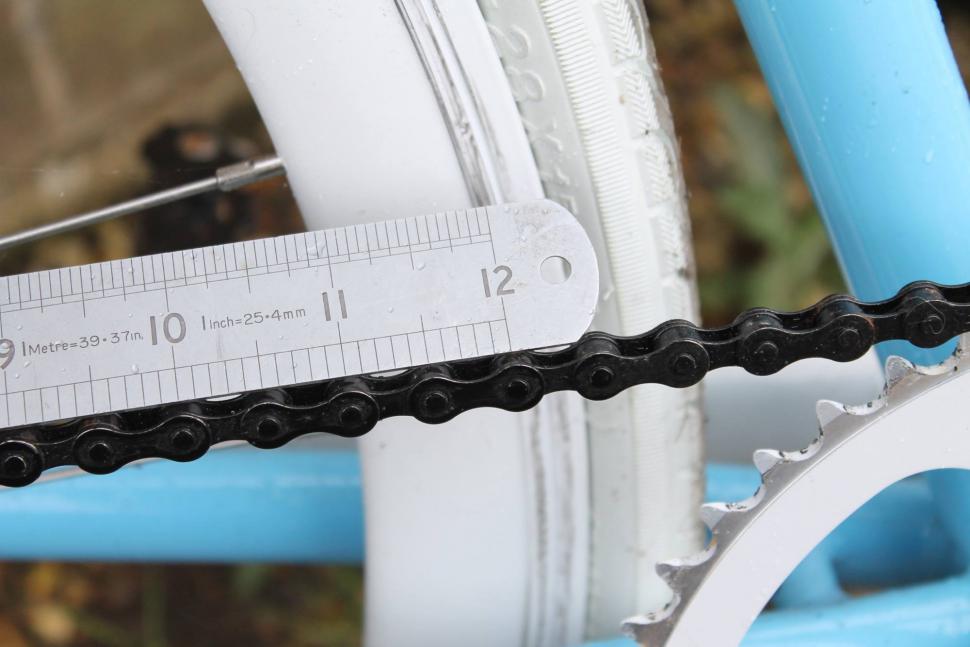
Measure With A Ruler
A ruler can be used to check the chain for wear. Since a standard chain has one complete chain link that is 1in in length, using imperial measurements makes this a little bit simpler.
Measure 12 complete links beginning at the first link pin. To be precise, you must apply some tension to the chain.
When a chain is worn, the 12in mark on the ruler won’t quite reach the appropriate link pin even though a standard new chain will have 12 complete links that measure 12in.
Your chain is fine if the distance from the 12 in mark to the center of the link pin is less than 1/16 in, but if it reaches that mark (or 1/8 in or 2/16 in), it is past the point at which it needs to be replaced.
It is simplest to measure 10 links in metric units.
Ten complete links will measure 25.4 cm on a typical new chain.
Your chain is fine if it is up to 25.5 cm from the center of one link pin to the center of the link pin located 10 full chain links away; however, if it exceeds that measurement, it must be replaced.
For greater accuracy, it is typically advised to replace an 11-speed or 12-speed chain when it has grown by 0.5%, or when 10 links measure 25.53cm, and to replace a chain designed for 10 or fewer gears when it has grown by 0.75%, or when 10 links measure 25.59cm.
Replace your chain when it reaches 1% wear, which is when 10 links measure 25.65cm, if you have a one-speed or two-speed bicycle.
We’d recommend using a chain wear indicator since figures like these are obviously very challenging to measure with a regular ruler.
Chain Wear Indicator
A cheap gauge that does exactly what its name suggests is a chain wear indicator, also known as a chain checker.
with an RRP is £9.99, but if you shop around, you can probably find it for less. Similar products are sold by other brands.
The chain is worn to the point where it needs to be replaced when the gauge tip on the other end completely fits into a chain link after you hook the curved end into it (one side measures 0.5% wear, the other side measures 0.75% wear).
Measure By Eye
There is another quick method for determining chain wear.
KMC advises, “If you don’t have a gauge, you can roughly determine the chain’s elongation by placing it on the outer chainring and lifting it up from the middle of the chainring. The chain, chainring, or possibly both are worn if you can lift it more than half a link.”
Since the chain in the image is almost brand new, there is little chance of lift from the chainring.
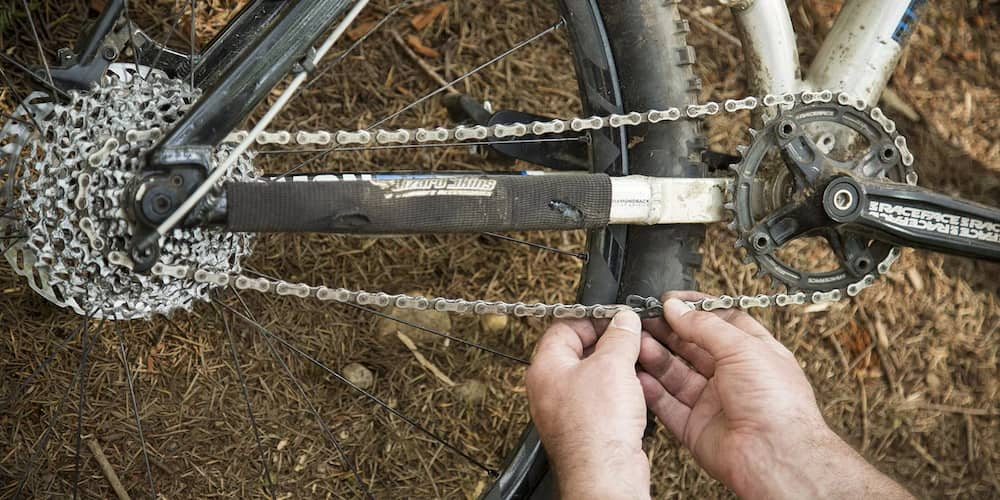
How To Replace A Quick Link Chain?
A set of missing link pliers makes it simple to replace a broken link in your bike chain. If a chain has a link that stands out from the rest, that link is the one that needs to be replaced. To change a missing link bike chain you need the following:
- Missing link pliers
- New bike chain
- Chain checker tool
- Old spoke tool
- Find the missing link in the chain of your bicycle. You’ll notice that one link clearly stands out from the others.
- A pair of missing link pliers can be used to release the chain from its attachment. After positioning the pliers on either side of the missing link (on the left and right, respectively), the pliers are closed, causing the chain to loosen.
- Place your new chain on the smallest chain ring
- Put your chain on the smallest cog on your cassette
- Run your new chain in front of the top jockey wheel of your rear derailleur
- Run the chain through the derailleur cage channel
- And behind the lower jockey wheel
- In order to determine whether the chain on your bicycle is long enough, place it on the smallest chainring at the front and the smallest cog at the back and make sure there is no slack. If there is any slack in that position, you must shorten your chain.
- You can use either the spoke hook on your missing link tool, which will make it a little easier to fit a bike chain. Use an old wheel spoke that has been bent into a hook if your tool lacks this feature. You can use it to remove tension from the chain by hooking the section of the chain you want to work on.
- Place the quick link plates both inside and outside the chain. The chain’s outermost quick link plate should have writing on it.
- Once the quick link plates are attached, you pull the chain just a little bit before using the missing link pliers to click them into position. Remove the tool once the chain is in place, and you’re ready to go with a brand-new chain!
Replace A Chain (without Quick Link)
Some bike chains need to be replaced with a chain breaker even though there is no missing link. You’ll need the following to replace a chain that has no missing link:
- Chain breaker
- New bike chain
- Chain wear tool
- Old spoke tool
- Pliers (flat nosed)
Almost everything you’ll need to replace a chain that is complete.
- Place the chain in a chain breaker
Correctly place the chain breaker on the chain. - The chain breaker must be screwed in.
It demands some work. Simply rotate it until the pin emerges from the other side. - Remove the pin by unscrewing the chainbreaker once more.
The chain will loosen when you take out the pin. - Lay the new chain over the smallest chainring at the front
Put the chain on the smallest chainring. - Lay the chain on the smallest cog at the rear
When putting the chain on the cassette’s smallest cog, make sure it stays on the chainring. - Run the chain in front of the top jockey wheel of your rear derailleur
A little forward movement of the derailleur cage will make it simpler to pass the chain over the upper jockey wheel. - Then run the chain through the derailleur cage channel
You can also move the derailleur cage a little forward to achieve this. - Lastly, run the chain behind and under the lower jockey wheel
The chain is now properly moving through the rear derailleur. - Now check that your bike chain is long enough
This is accomplished by making sure the chain is tight when it is on the smallest chainring and cog. If there is any slack, it needs to be tightened. You can shorten your chain by removing links with a chain breaker. - To make fitting your chain easier, remove some tension with a handy spoke tool
Typically, missing link pliers come with this tool. You can simply construct one from an old spoke if it isn’t. - Close your chain by inserting the connecting pin
These come standard with brand-new bike chains. - It’s important to keep an open and a closed end on the chain
Join the two links with a clip. - Then screw the pin in with the chain breaker
Additionally, some hard work is needed for this! - Finally, remove the ends of the connecting pin with a pair of flat nosed pliers
Voila, the chain on your bike has been successfully changed!
Chain Maintenance
Your bike has a lot of moving parts, and as you are aware, we advise performing your ABC check prior to each ride. Let’s delve a little deeper into your chains even though each step in that process is crucial. Here are some chain maintenance suggestions to keep all of those components functioning properly.
Bike Chain Wear
Chains deteriorate like any other component of your bicycle, and frequently more quickly than we would like. Chains lose their precision with the cassette teeth as a result of “stretching” and resulting wear. This stretch is caused by the pin in each link wearing against the inner and outer chain plates, slightly enlarging each link’s hole instead of the actual metal itself. When the pin rotates within the plates, this occurs most quickly when there is metal on metal contact. Oil keeps these contact points properly lubricated to prevent this from happening as frequently and to slow down the rate of wear on the metal.
Measure Chain Wear
Chain stretches a little bit over time, but this is normal and always happens. When it stretches too far, the cassette’s teeth start to deteriorate as well, which is when a problem arises. The cassette will eventually need to be replaced in addition to the chain.
A chain stretchiness gauge is a useful tool, but a tape measure will work just as well. A full link is one inch long when it is brand-new. Measure one foot from the same point on the chain to determine how far it has stretched to take into account additional links. The chain is still considered to be gold-plated if the foot mark deviates by less than 1/16 of an inch from the same point on the link. If it is larger than 1/16th of an inch, the cassette probably doesn’t need to be replaced, but the chain does.
Riding the bike with the new chain and applying pressure to the pedals in a few of the smaller gears is the only effective way to determine if you also need to replace the cassette. They don’t line up precisely enough if the chain slips, but if there are no problems, everything is fine. You need a new chain and cassette if the chain is off by more than 1/8th of an inch.
Wash A Chain
The best and simplest way to wash a chain is to use a degreaser while it is still mounted to the bike. Other methods include completely removing the chain from the bike. Spin the pedals backwards and use a degreaser before washing your bicycle. After that, scrub the chain with a sturdy bristled brush to remove any grit and grime and to push the degreaser deeper into the links.
Using a chain cleaner mechanism, which consists of several rotating brushes in a small plastic box filled with degreaser, is an additional effective way to clean your chain. Running your chain through this not only coats it in degreaser but also makes it simple to remove a lot of the dirt and used oil.
After brushing and degreasing the chain, wash it with regular soap and water as you would the rest of your bike. Then, spray a good amount of water through the links to ensure that all of the grit and any degreaser residue are removed.
Wipe Your Chain
After a thorough wash, spin the pedals backwards while passing the chain through a dry rag to extract as much moisture as you can. Since oil seeps onto the entire chain when you ride and gathers dirt from the road, this should actually be done after every ride. If left running, this debris will eventually find its way into the chain’s moving parts, accelerating the chain’s wear and tear. Additionally, wiping your chain makes it look brand-new for every ride rather than black, which, if you’re not careful, can leave a nice mark on your leg.
A helpful tip is to keep a rag nearby where you store your bike so you can quickly wipe it down after each ride. Once inside, you can simply wash off any oil that did manage to get on your hands.
Lube
We can now apply bike-specific chain lube after completing all the prerequisite steps, which include washing and wiping the chain. Bike-specific oil is both thin enough to fit into the tiny spaces between pins and links and thick enough to not wear off too quickly. Motor oil should not be used because it contains detergent that removes engine waste and is designed to be constantly restored to the location where it is needed. Because they are too thick, household oils can become clogged.

![Sole Bicycles Review In 2022 [Uodated] All You Want To Know](https://www.bikeyourbest.com/wp-content/uploads/2022/10/Sole-Bicycles-Review-In-2022-Uodated-All-You-Want-To-Know-2-300x195.jpg)